I’ve mentioned this before in other posts, but one of the interesting facts we learned at the onset of our conversion process is that it is illegal to impersonate a school bus in just about every state. What this means exactly can vary from state-to-state, though most states mandate that, at the least, you have to remove the all school bus insignia, flashers, & stop sign in order to reclassify your vehicle as an RV. Though not required in Texas, many states also mandate changing the exterior color of the bus. For our part, we’d always intended to repaint as we’re just not all that crazy about the shade “school-bus-yellow”.
Well, like most things in this conversion story, the process of painting the bus took quite longer than we anticipated . Despite the delays, we completed the new paint job in April (this post is long overdue). Here’s an overview of what went down:
The Poor Man’s Automotive Paint
Our initial intention was to use automotive paint seeing as the bus is a motor vehicle and all, however a trip to the local auto-paint supplier quickly dashed our hopes of this ever being within our price range. After several days of visiting different paint shops, and detailed discussions with their staff, we eventually settled on a urethane-based marine/industrial-grade paint carried by Sherwin Williams. (Or, as the very helpful store associate called it, “the poor-man’s automotive paint”.) All in all, we ended up purchasing about 6 gallons of paint + hardener in two different colors (mixed to order!) for about $600… a far cry from the $3k we we+re looking at for automotive paint.


(We unintentionally stumbled into a nautical theme with color selection.
Color swatches courtesy of Sherwin Williams’ website)
Prep, Prep, Prep, and Prep some more!
To keep the possibility of screw-ups to a minimum, it became really important not to half-ass the prep work. Here’s everything we did prior to painting:
Sanding: To get the new paint to stick, we first had to sand down the entire exterior of the bus. By. Hand. It was the most tedious work we’ve done on the bus to date and took about 10 days to complete. We used hand-held electric sanders on some of the broader/flatter surfaces, however, all of the curved surfaces and nooks and crannies had to be hand-sanded with 150-220 grade paper. Full respirators were required and we ended each day covered in a fine-coating of yellow dust. In short, sanding sucked.
Cleaning: Both before and after sanding the entire bus had to be scrubbed down with soap and water, followed by a wipe down with mineral spirits. In addition to all of the paint-dust from sanding, several years’ worth of road grime was washed away.
Masking: All of the windows, lights, and generally any other surface we didn’t want painted had to be covered over with masking paper and painters’ tape. Masking actually had to be done twice: once to apply the first two coats of the primary color, and a second time (several days later) to apply the accent color on the bumpers and trim. Suffice to say we went through a lot of of painters’ tape. We also had to spray any areas of bare metal with Rustoleum primer, followed by 48 hours of waiting for the primer to fully dry.


Painting:
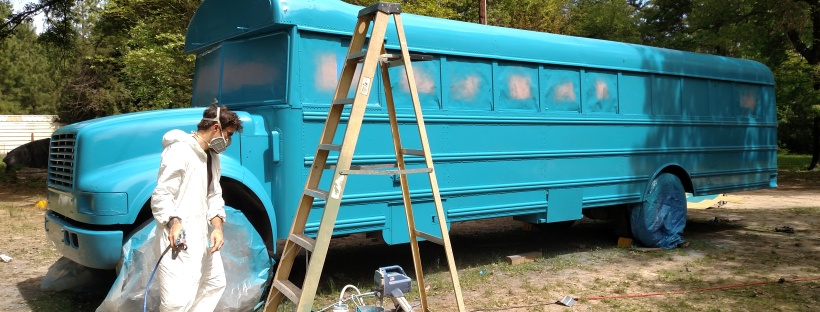
The specific paint that we chose had to be mixed together with a hardener prior to application with an airless sprayer. Once mixed however, we had only a two-hour time window during which to finish applying each coat before the paint actually started to harden on the surface of the bus and in the hoses of the sprayer. Essentially, not much margin for error. The planning of the whole paint job was further complicated by the fact that we were painting outdoors and were subject to fluctuations in humidity, air temperature, and weather, and that we had specific time periods we had to wait between each coat of paint. After a few days of closely watching the weather forecasts, we were finally able to get started.
Ryan manned the sprayer while I mixed each gallon of paint/hardener, kept track of time, and maneuvered the sprayer equipment/hoses/paint supply on the ground. Both of us sported goggles, respirators, and Tyvek suits for head-to-toe protective coverage, which, according to Ryan’s brother, made us look like weird, human-sized insects.


Results:
All in all, we’re pretty satisfied with the outcome of the paint job. The hardness of the paint isn’t quite as tough as true automotive paint, but for a fraction of the price, we’ll take it. Once we hit the road, we’ll be cruising in a big turquoise-colored bus!


BLOG READERS: Have a question for us? Post it in the comments section below.

I love the color. You will def be able to see you coming down the road. Love the haz-mat suits
LikeLike
Great job. Such commitment.
LikeLike
How did you handle ‘runs’ from the rivets? That seems to be a common issue. thanks!
LikeLike
Thanks for reading the blog! We actually didn’t have a problem with running paint around the rivets. We applied the paint pretty thickly, so that might have helped prevent the issue. Wish I could help more – maybe check Skoolie.net for more insight?
-Justine
LikeLike
Hi! and thanks for the reply! your bus looks awesome. gives me encouragement about spraying. thanks again
LikeLike
How has this held up. Looks good in photos
LikeLike
@Connie – the paint job has held up well, considering all of the weather and variable conditions it’s been through. No chipping or peeling, though the roof is starting to look a bit sun faded.
LikeLike
Do you remember the line you used of Sherwin Williams paint?
The local branch wasn’t sure what I was referring to when I asked for the poor mans car paint.
Thanks! Bus looks fantastic.
LikeLike
Thanks for reading our blog post! Unfortunately, it’s been so long that I don’t remember the exact name of the paint product we used for our bus. “The poor mans automotive paint” was a nickname one of the staff members in our local Sherwin Williams branch used jokingly to describe the product we purchased – though it’s probably not a term that’s widely used at many other branches.
We ended up selecting a urethane-based product from their Marine/ Industrial paint line after a relatively long conversation with the Sherwin Williams staff about our goals, budget, painting equipment, and the condition of the surface we’d be painting over. My best advice would be to have a similar discussion with a team member at local paint stores near you. Good luck!
LikeLike
Hey there! I know its been a couple years since painting, but that leads me to this question … how has the paint job held up and would you choose that same paint (and process) again looking back?
Thanks so much for this great blog! XOXO
LikeLike
The paint job has largely held up well – no major chipping or flaking. The color at top of the bus is starting to look a little
LikeLike
faded due to sun exposure.
LikeLike
Hi Justine, wondering how, 4 years later, this is holding up? Thank you!
LikeLike
Hi Tanya, the paint is holding up well – no major chipping or flaking. Bit of color fade at the top of the bus from sun exposure though.
LikeLike
Hi! I was just wondering what type of hardener you used?? Thank you, it looks great!!
LikeLike
Sorry, Brooke – we don’t recall the specific type anymore. Best advice is to talk to the staff wherever you’re buying paint to see what type they recommend.
LikeLike